Setting up SSH for your Parallella
The goal of this tutorial is to allow you to connect to your Parallella board from your laptop using an SSH connection. If you don’t have an HDMI monitor, SSH is the the principle way to run programs remotely and transfer files between the Parallella board and your computer. This page is based off of the original tutorial I wrote in November 2014. Special thanks to 2LT Zach Ramirez and Jim Beck for their help in putting together the initial draft of this tutorial.
What you will need
This tutorial assumes that you have access to the following things:
- A Parallella Desktop Edition board that is already setup for initial use.
- A Windows machine with Putty installed. If you run OSX or Linux instead,
you should still be able to follow the majority of this tutorial using the
sshcommand. - A crossover ethernet cable. Please note that this is different from the standard CAT5 ethernet cable that you use to connect to the Internet! Crossover cables are specifically designed to let you connect two computers directly.
Configuring the Parallella with a static IP
We will first configure our Parallella board with a static IP address. This will allow us to connect to the board, even though our Parallella is not connected to the Internet.
- Boot up the Parallella using HDMI display and pull up LXTerminal.
- Ensure/edit the file
/etc/network/interfacesso that it contains the following lines:
auto eth0
iface eth0 inet static
	address 10.0.0.3/8
up route add 10.0.0.2 dev eth0- Next, edit the file
/etc/hostnameand give your board a new hostname if you wish.linx12345is an example. - Edit
\etc\hostsand add the following line (assuming the IP address and hostname matches the above)
10.0.0.3 linx12345- Reboot the board using the command
sudo shutdown -r nowto allow the OS to process the changes you just made.
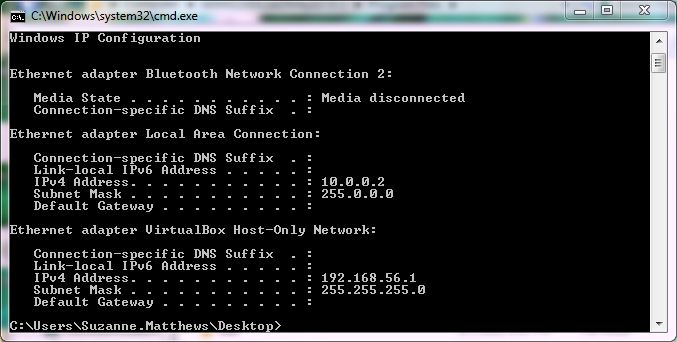
Running ifconfig in the terminal when the Parallella comes back up should
confirm that your board’s IP address is now 10.0.0.3.
Configuring your Putty Install
We will now update our Network adapter settings on our Windows machine to enable us to use a static IP address when using a crossover cable.
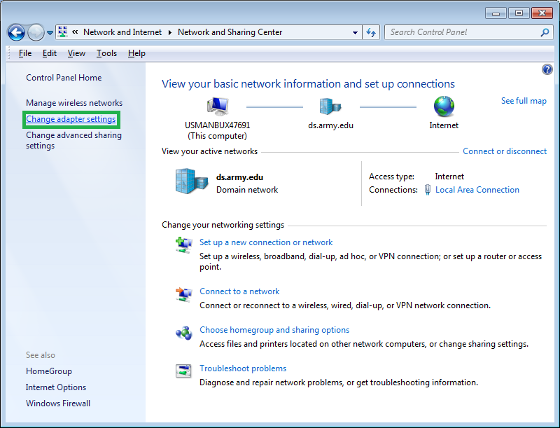
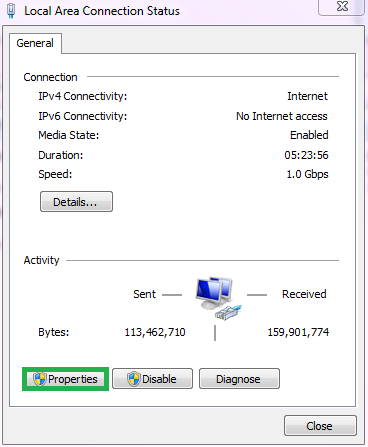
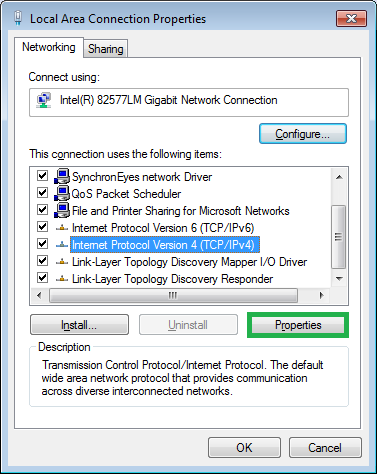
- Under Control Panel, select
Network and Sharing->Change adapter settings->Local Area Connection->Properties->Internet Protocol Version 4 (TCP/IPv4)->Properties
- Click on
Alternative Configuration. Indicate that the IP address should be User configured, and enter10.0.0.2as your IP address.
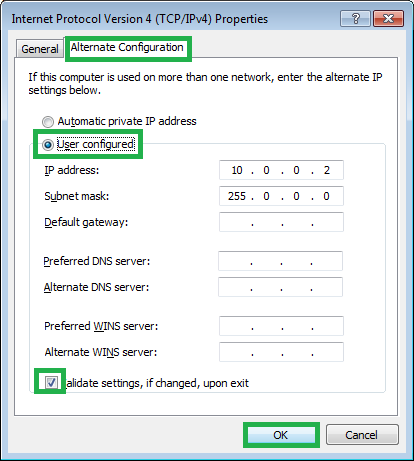
- Check
validate settings, if changed, upon exitand clickOK. - Open up a command prompt on your Desktop (SHIFT->Right Click-> Open Command Windows Here) and ensure that you have an IP address of
10.0.0.2. If you don’t, it may be necessary to reboot your machine.
- Connect your Parallella to the laptop using the crossover cable and turn it
on. Ensure that you have connectivity to the board by typing
ping 10.0.0.3into the command window. You should get a series of responses from the board.
Connecting to Parallella with Putty
Since Windows does not have built in ssh, we use the Putty program to connect to the board using the SSH protocol.
- Navigate to your Putty install and double-click on
putty.exe. - Create a new profile in Putty that looks like the following:
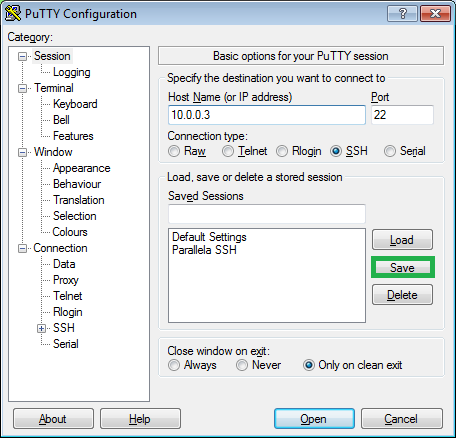
- Save the profile as Parallella-SSH. Clicking
openshould give you a login prompt. - Login using the
linarousername andlinaropassword.
If all goes well, you should now be connected to your board! Check out the follow up tutorials on learning how to program Epiphany architecture.
Using PSFTP to Transfer Files
PSFTP (Putty Secure FTP) is a free client that you can also download from the Putty site that enables you to securely transfer files between computers. PSFTP will acts as an interactive FTP session that allows you to list directory contents, browse the file systems, etc. Since my students and I are not permitted to attach our Parallella boards to our university’s network, we used PSFTP constantly to transfer files between our laptops and the Parallella board.
-
Start by navigating to your Desktop and opening a command window. Assuming you placed the psftp.exe executable in
C:\Program Files\Puttytype in the following:"C:\Program Files\Putty\psftp.exe"and pressEnter. This will execute the PSFTP program from your Desktop. Why we are doing it this way (rather than navigating to the folder and double clicking like we did before) will become readily apparent shortly. -
Let’s logon to the Parallella using PSFTP. Type
open linaro@10.0.0.3to establish a connection, and type in the username and password. You should see a screen like the one below if everything is successful. Ignore theno hostname specifiedmessage that appears when PSFTP first starts up.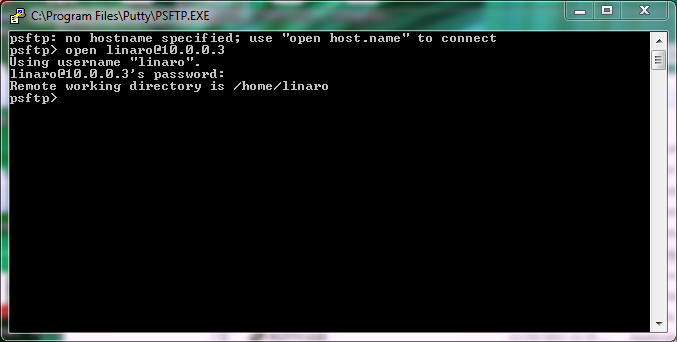
The PSFTP prompt acts like a Linux terminal. You can ls, cd and execute
other Linux bash shell commands. In the following set of examples, we will be
transferring files from the parallella-files/para-para/src directory
and your Desktop.
Use get to transfer files from Parallella to Windows
To transfer files from the Parallella board and place it on the Desktop, we
will use the get command. Doing this from the Putty directory under
Program Files may lead to an error, since the folder may be write-protected.
Type the following into the PSFTP prompt:
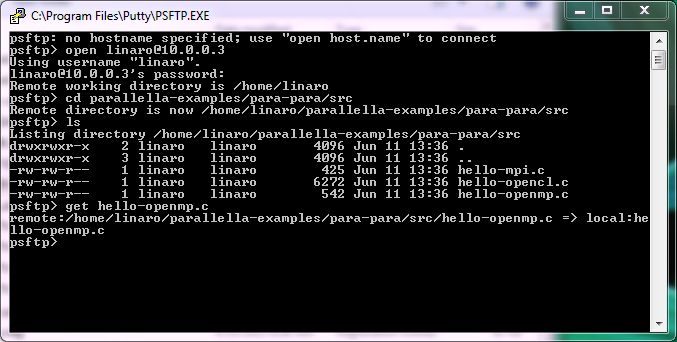
cd parallella-examples/para-para/src
get hello-openmp.c
In a few seconds, the hello-openmp.c file should appear on your Desktop. A
screenshot from this sesson is shown below:
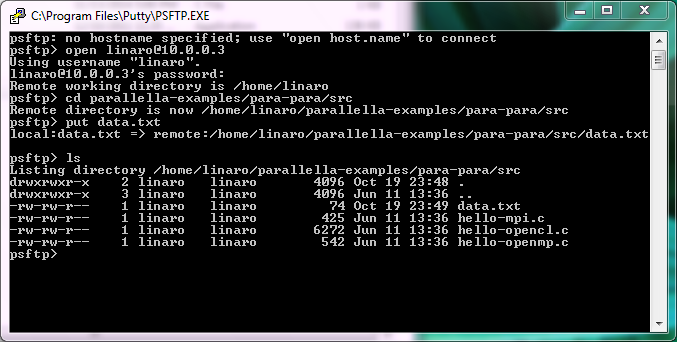
User put to transfer files from Windows to Parallella
To transfer files from Windows to the Parallella board, we start in the
same way as before. Start psftp from the Desktop, and logon using
the command open linaro@10.0.0.3. Let’s place the file called data.txt in
the the parallella-examples/para-para/src directory. Type the following into
the PSFTP prompt:
cd parallella-examples/para-para/src
put data.txt
ls
You should see data.txt now in the folder. A sample screenshot from this
session is provided below:
Troubleshooting
Below are a series of helpful troubleshooting tips organized in Q/A form.
My Parallella’s IP is not 10.0.0.3!
You may not have followed the above steps to the letter. I believe the image that I posted should automatically configure your board to the above static IP address. In case you chose another image (or for whatever reason, it did not) check the following:
- Ensure that all the files in the first section match what is specified. In
particular,
/etc/hostsand/etc/hostnameshould have the same hostname! - Run
ifconfig -ato ensure that the address is10.0.0.3
My Windows machine’s IP is not 10.0.0.2!
Even if you properly followed the instructions for configuring your network adapter above, be sure to do the following:
- Ensure that you followed the network configuration settings above exactly.
- Reboot the computer with the network cable connected to a Parallella board that is ON. Sometimes, this is what is needed in order for the machine to realize that it should use the alternate configuration.
- Try turning off your wireless.
- Using the
ipconfigcommand to ensure that the IP address is10.0.0.2. - Try the following: prior to turning on the parallella, connect the crossover
cable to the parallella. Then, turn on the parallella. The network port lights
should turn on the parallella. Now, check your laptop’s IP address. It
should now be
10.0.0.2.
Ok, I can connect to my Parallella now, but I can’t access the internet!
Yes, this is an issue with this set of instructions. I haven’t quite figured out how to enable SSH for the Parallella without somehow simultaneously disabling your ability to access the internet on your laptop. You may not have this problem, but a significant proportion of my students (thought not all) did while they were using their Parallella.
Will I be able to connect to the Internet after I’m done using my Parallella?
Once you are done using your Parallella for the day, shut it down using
sudo shutdown now, disconnected the crossover cable and reboot your machine.
You should be able to get a wireless internet connection or connect your
machine via ethernet without having to change any of the settings above.
I can’t seem to transfer files from the Parallella board to my Windows laptop!
Make sure you are following the instructions above for PSFTP. If you are and it is still not working, check and make sure you are not trying to write to a write protected directory. If the directory is write protected, you will not be able to transfer files to it. Transfer the files to a non write-protected directory (like the Desktop) instead.
Files are taking too long to transfer. What should I do?
Some of you may see the program appear to hang when you are transferring large files. Use compression such as 7zip to compress the files before transfering. This will enable you to transfer larger files more quickly. Other than that, be patient!
Any way to transfer a large number of files at once?
Try creating an archive (use tar or place in a folder and zip it up) and
then try to transfer. Be sure to use compression to make sure that the
transfer goes as fast as possible.