Parallella Setup Tutorial
The goal of this tutorial is to allow you to set up your Parallella board for first use. These instructions are adapted from the original SD-card guide provided on the Parallella website (update: these instructions have been improved quite a bit since I wrote this tutorial.) This page is based off of the original tutorial I wrote in November 2014.
What you will need
This tutorial assumes that you bought a Parallella Desktop Edition and have access to a Windows machine. I’ve included a list of all the items I purchased for Parallella setup in the table below:
| Name | Price |
|---|---|
| Parallella Desktop Edition | 149.00 |
| IoGear 4-port powered USB hub | 22.93 |
| 8GB MicroSD card w/adapter | 6.60 |
| MicroUSB to USB (F) cable | 5.99 |
| MicroHDMI to HDMI (F) cable | 2.96 |
| Crossover cable | 3.99 |
| Total | 191.47 |
If you buy the headless edition of the board and plan to SSH remotely into it, then the only accessory you will need in the above list is the crossover cable. I bought the Desktop edition because I thought my students would appreciate a more ‘desktop-like’ experience. YMMV.
In addition, make sure you have a Windows laptop with a built in SD reader. If your laptop doesn’t have an SD card reader, you can buy an SD card USB adapter for cheap online.
Before you begin the tutorial, please follow these instructions to properly install the heatsink for the board. Do NOT attempt to use the board without the heatsink!
Format the SD card
The SD card will be used to house the operating system of our Parallella board.
To set up our system for initial use, we must first install an image of our
desired operating system on it. In essence, an image allows us to get a set of
desired software onto our system quickly and relatively painlessly. We provide
the image and all other requisite files for you in the par-master.7z file that
you can download here. Please be sure to check the Parallella website for
updated images.
- From the Web: Download & Install Win32 Disk Imager (you may need to use admin privileges).
- Also Download/Install SDFormatter (you may need to use admin privileges)
- Insert an SD card into SD card reader slot. Use the SD card adapter that came with the microSD card.
- Open the SDFormatter program. Select the drive the SD card is in (usually the F drive).
Be absolutely sure that the selected drive is the one associated with the SD card!
Click
Option. Set The format type toFULL (Erase)and Format size adjustment toON. ClickOK, and then clickFormat. Wait until the Formatting procedure is complete. Close the SDFormatter application.


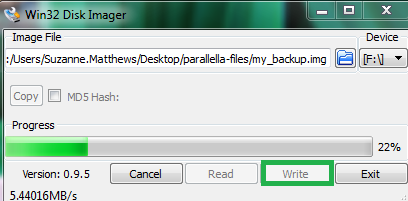
- Next open the Win32 Disk Imager program. Select the drive the SD card is in (usually the F drive). Be absolutely sure that the selected drive is the one associated with the SD card!
- Download the file containing the Parallella image to your Desktop and
extract the files. Using the folder icon in the Win32 Disk Imager program,
navigate to where you downloaded the image. Click on the
Writebutton to begin writing the image to the SD card.
- Once the process is done, it will appear that there is nothing on the SD card. This is fine!
-
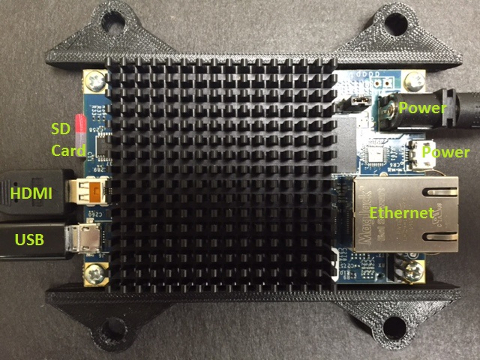
Once you are done, safely eject the SD card and remove the microSD card from the adapter. Place the microSD card into the microSD card reader on your parallela board. Connect the microUSB adapter to the power USB hub, and attach the keyboard and mouse to the hub. Connect the monitor’s HDMI cable to the microHDMI cable. Make sure your cable configuration matches the picture below.
- Boot up the board. Eventually, a login screen should appear. Login in with
username
linaroand passwordlinaro.
Expanding the image to fit the disk
This is useful if you have a sd card greater than 8GB. Running
df -hon the system will show you that only a very small portion of your SD card is actually available for use. Essentially, you will need to expand the image to fit the entire disk. Open up a terminal and type in the following series of commands:
dmesg | grep "root"
root=/dev/mmcblk0p2
/dev/mmcblk0p2 is your root partition. This is what we want to expand. Type
this next:
fdisk /dev/mmcblk0Type m for help (the m stands for menu). Next, we need to change the
partition table. Let’s delete partition 2 (root partition), and then create a
new partition 2. Type in d followed by 2 to delete the root partition.
Next type in n followed by p and 2 to create a new partition 2.
For the first and last sector, choose the default (press enter).
Type p to confirm.
Now, write it to disk by pressing w.
Reboot the machine by typing
sudo shutdown -r nowRunning df -h after it comes back up again should show that you now have
the entire disk available for use. Note: on the most recent image, you will
need to run the following command after restarting:
resize2fs /dev/mmcblk0p2Building the Case
The 3D printed case that I provide is specifically designed for the Parallella. While the Kickstarter gave original backers a case for their Parallella, I’m not aware of one for general purchase. I designed this case (with the help of our department tech Frank Blackmon) last summer for use in my class.
The case is passively cooled, and neither my students nor I encountered any problems with overheating. If you have a 3D printer, download the free SolidWorks STL file and print the following case parts:
- 2 base boards
- 4 end connectors
I also suggest you buy 4 little rubber feet (LRFs) and 4 small screw to actually connect your parallella to the base boards. I provided my students a bag with all the case parts at the beginning of the semester with their Parallella boards.
Place the 4 end connectors into one of the base boards. Carefully place the Parallella board onto the base board (align on the screw holes). Using a non- magnetic screwdriver, carefully attach the Parallella board to the first baseboard. The other base board is the cover.
Place the LRFs underneath the bottom baseboard. We do not recommend that you place the LRFs under the connector positions if you plan to use it as part of a larger cluster (see followup tutorial).
Troubleshooting
There are a number of problems you may face during setup. I’ve compiled a list of the most common issues, and ways to rectify them.
Nothing comes up! Is my board defective?
Most likely not. My students and I had no issues with our boards. However, there are a few things you should check for:
- Ensure that when you attempt to boot the board, you see two LED green lights. These should be constantly lit when the board is on. If the LEDs are not green or if they are flashing, you may have a power issue, and should contact Adapteva.
- Ensure that the cables are properly plugged in. Make sure that the microUSB cable is plugged in as shown in the image included above. It is absolutely crucial that you NOT plug anything except a power adapter into the microUSB port next to the power port! This microUSB port is for power only!
- Next, try and press the
NumLockkey on the keyboard. Does it light up? If so, the keyboard is registering. If your screen remains blank, there may be an issue with the monitor.
I tried everything you said above, but it still doesn’t work!
If everything above works, and you STILL don’t see anything on your monitor then you may be having some other issues. The Parallella board is pretty finicky. A couple things that I’d suggest checking:
- you need a USB 2.0 compatible power USB hub. In other words, it MUST implement the USB 2.0 standard exactly. There are a lot stuff out there that may not necessarily work as a USB hub. When I originally bought parts for the course I found these really cute 2 port USB splitters. They didn’t work – I was so mad. I’ve gotten other USB splitters to work with my Parallella board, but I’ve noticed things like my screen flickering when I use it. Adapteva strongly recommends that you buy a powered USB hub, and I think it’s probably a good idea to get one, even if it is more expensive.
- Your monitor MUST have a native HDMI port. If you don’t you may need a different monitor. This (embarassingly enough) took me a little bit to figure out. So, if you have a VGA monitor, don’t expect that an HDMI to VGA adapter will do the trick. It will not work.
If you don’t want to buy any of the above materials and don’t mind just SSHing into your Parallella, take a look at my other tutorial.
Other notes
The default shell is tcsh not bash. If you (like me) are more comfortable
operating in bash, do the following in order to switch your default shell,
use the chsh (change shell) command. Indicate that the new shell should be
/bin/bash. You will need to restart the machine to see this change.